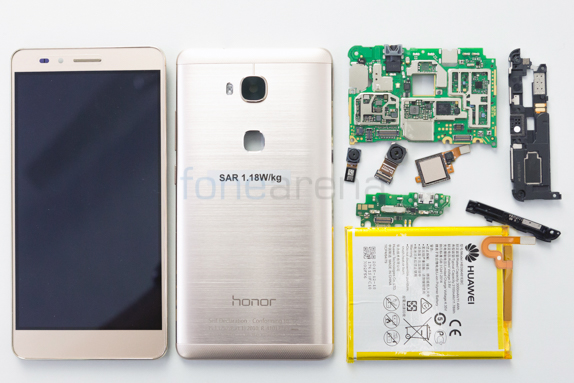

The Honor 5X is one of the best devices in the sub 15k range in India thanks to the specs and premium build quality. We wanted to take a look at the internals to see what exactly makes it tick and this teardown is a result of that. We have included images and an accurate description of the steps involved.
httpv://www.youtube.com/watch?v=g4lFX7hK1hc
The specifications of the Honor 5X are:
- 5.5-inch (1080 x 1920 pixels) Full HD IPS display
- Octa-core Qualcomm Snapdragon 616 (MSM8939) (4×1.5GHz + 4×1.2GHz) processor with Adreno 405 GPU
- 2GB RAM, 16GB internal memory, expandable memory up to 128GB with microSD
- Dual SIM (micro + nano)
- Android 5.1 (Lollipop) with EMUI 3.1 Lite
- 13MP rear camera with LED Flash, Sony / Samsung sensor, f/2.0 aperture, 28mm wide-angle 5P lens
- 5MP front-facing camera, f/2.4 aperture, 22mm wide-angle lens, 1.4 micron pixel size
- Dimensions: 151.3×76.3×8.15mm; Weight: 158g
- Fingerprint sensor, Box speakers with Smart PA audio chip
- 4G LTE / 3G, WiFi 802.11 b/g/n, Bluetooth 4.1, GPS
- 3000mAh battery
The first step as always is to switch off the smartphone and remove the card slots in order to start the teardown. The two screws at the bottom of the phone were the first to be removed. Once they are taken out, you can pry open the metal back using a prying tool.
The back panel is made of aluminium and comes with cutouts for the rear camera as well as a fingerprint sensor. We have the ribbon cable for the battery, display and fingerprint sensor hidden under the metallic shielding which has to be removed to disconnect the battery.
We then disconnected the other ribbon cables connecting the USB port, fingerprint sensor and the display. The fingerprint sensor is held in place with glue and needs to be taken out with some force. The fingerprint sensor unit itself is actually rectangular in shape and not the rounded shape as the cutout you see at the back.
We then removed the screws that helped us take out the logic board. We then removed the battery and USB port after removing the plastic cover that protects the latter. This plastic cover also houses the loudspeaker.
The microUSB assembly too is glued to the phone and also houses the primary microphone. We then removed the 3000 mAH battery which is manufactured by Sony.
The display unit also houses the vibrator motor, internal speaker and display cable. We then took the front 5 Megapixel OmniVision OV5648 front facing camera off from the logic board.
Then, we took out the rear 13 Megapixel Sony IMX214 camera as well. We also removed the metal shielding over the logic board to take a closer look at the internals. At the front of the logicboard, we have the proximity sensor, 3.5mm audio jack, SKHynix 16GB memory module and the Qualcomm MSM8939 Snapdragon 616 SoC. You can also find the microSD card slot and DualSIM card slots here.
At the back side, we have the Qualcomm RF transceivers as well as the power controller ICs too. Do let us know if you have any questions in the comments section below. Hope you enjoyed the teardown.
