![]()
Xiaomi’s Redmi unveiled the Redmi Note 8 series in the country back in October running MIUI 10.3 Global Stable on top of Android 9.0 (Pie) and later rolled out MIUI 11 update to both the smartphones. The Pro variant has been the talk of the town since it is superior to the vanilla Redmi Note 8 in almost every aspect, except for the development aspect, thanks to the Qualcomm Snapdragon SoC.
Redmi Note 8 Pro has already received Android 10 update but Redmi Note 8 still runs on Android 9 and will probably receive Android 10 update with MIUI 12 but you can always install a custom ROM to stay on the latest version of Android. We recently tried Pixel Experience Plus on our Redmi Note 8 unit and here is our post that may help you in deciding if you should flash it on your device.
Performance and Benchmarks:
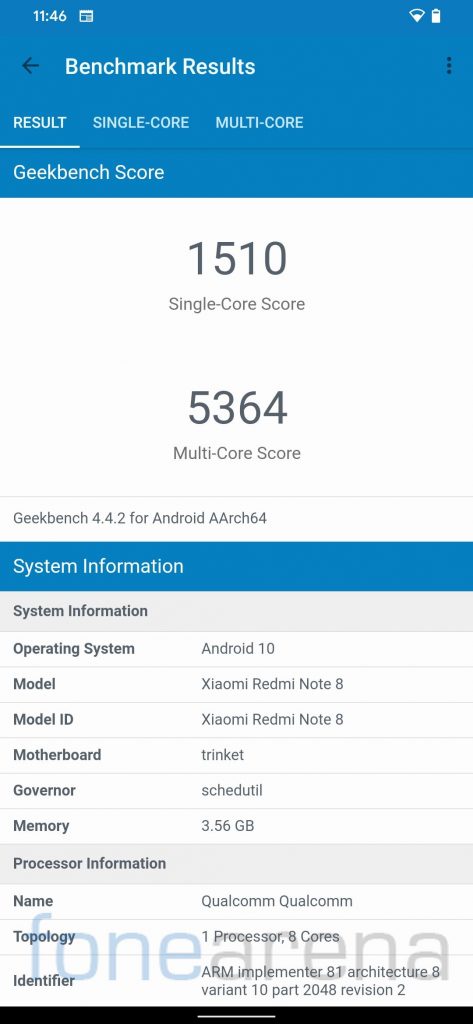
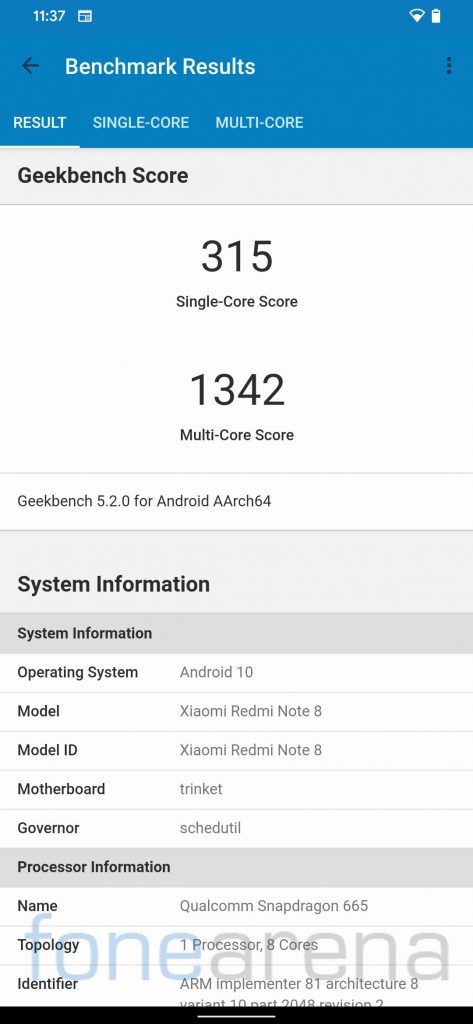
Redmi Note 8 features Qualcomm Snapdragon 665 under the hood which is still a good mid-range processor. It scored 1510 points in the single-core test and 5364 points in the multi-core test in Geekbench 4. In Geekbench 5 test, it managed to get 315 points in the single-core test and 1342 points in the multi-core test.
It runs PUBG on smooth graphics with medium frame rate and COD on medium graphics with high frame rate. I played COD on high graphics and high frame rate and it was playable with minor frame drops. The performance on the Pixel Experience Plus was good for the most part, I used it as my daily driver for about 3 weeks and didn’t encounter any major issue apart from a couple of random reboots. It manages to keep apps in memory while multitasking.
Software, UI, and Apps:
As the name suggests, the Pixel Experience ROM aims towards providing a clean Pixel-like experience on the device. There is no bloatware pre-installed, only a few Google apps preinstalled.
Out of 64 GB internal storage, 18 GB is occupied by the system and users get around 46 GB of free storage. Pixel Experience Plus for Redmi Note 8 has June security patch as of now, but most of the devices running Pixel Experience receive monthly security patch OTA update.
Android 10 features system-wide Dark mode along with styles and wallpapers to customize accent color, icon shape, and font all of which can be found on Pixel Experience Plus as well similar to any other AOSP based ROM. Users can also customize Font size, Display size, and Notch behavior as per their preferences. It also features Adaptive brightness which was introduced back in 2018 with Android Pie.
Android 10 offers various choices for navigation, users can choose between 3-button navigation, 2-button navigation (Pill based, similar to Android 9.0 Pie), and gestures navigation. Users coming from MIUI will find the Android 10 gestures very familiar. Additionally, Pixel Experience Plus also offers an option to hide the navigation bar.
Apart from navigation gestures, it also offers a three-finger screenshot gesture similar to MIUI. You can also use double-tap anywhere to wake, double-tap on the status bar to lock the device, and double-tap on the lock screen to put the device to sleep (check the screenshots above in the display section).
Pixel Experience Plus also offers freeform mode in addition to Android native split-screen feature which lets you resize the display window as per your preference which is similar to MIUI 12 Floating Window feature. You will also find Google recorder app on the Pixel Experience ROM along with an inbuilt screen recorder.
Google introduced Bedside feature as a part of latest Pixel feature drop which is available on Pixel Experience Plus as well. Bedtime feature is aimed at helping users maintain a consistent sleep schedule. You can read more about bedtime feature along with other June Pixel drop features in this post.
Long screenshots are also supported on Pixel Experience Plus, there are only a few ROMs that support this functionality. Pixel Experience Plus focuses on providing a minimal clean pixel-like experience but project developers have also included nifty features and customization such as network traffic monitor, quick pulldown for notifications, quick setting tile customizations and others. Check out the following screenshots,
Fingerprint Sensor and Face Unlock:
The fingerprint works flawlessly on this ROM as you would expect, users can add up to five different fingerprints to unlock the phone. The fingerprint animation is slow similar to any other AOSP ROM due to which the phone unlocking experience feels slower as compared to stock MIUI Global ROM but during our usage, we found it accurate and reliable.
You will also find the Face Unlock feature on Pixel Experience Plus similar to Extended UI, which works pretty well but it is less secure compared to a password or a pin.
Camera:
The inbuilt camera app is very basic, you can install GCam apk mods to get the better results along with portrait and night mode but you need to flash this zip file via Magisk manager to be able to use ultra-wide-angle and macro lens with GCam mods. Link for a working GCam mod along with the config file can be found in the download section.
Battery Life:
The battery life on Redmi Note 8 with Pixel Experience Plus was decent, the device lasts for a day easily with moderate to heavy usage. I got around 6 hours 30 minutes screen on time with 11% battery left, check out the screenshots for more details for app usage.
There is a battery saver mode that restricts background activities to save some power and should help and turns on dark mode automatically when the phone is low on charge. It also offers Adaptive battery mode similar to what you get on any Stock Android phone.
So should you try Pixel Experience Plus on your Redmi Note 8?
Absolutely, I don’t see any reason to not try Pixel Experience Plus on Redmi Note 8. Though if you’re a heavy user, you might need to charge the device before the end of the day. Pixel Experience Plus offers clean bloat-free smooth performance along with decent amount of customizations.
Highlights
- Bloat-free UI
- Fluid day to day performance
- System-wide themes and accent colors
- Cam2API enabled
- Gestures based navigation
- Banking apps work without any issue after flashing Magisk
- Face Unlock
- Screen Recorder
- Long Screenshots
- Monthly OTA Updates
Cons
- Bluetooth setting crashes
Requirements:
- Redmi Note 8 with an unlocked bootloader – To unlock the bootloader of your device, apply here.
- TWRP recovery for Redmi Note 8 – Click here to download.
- Pixel Experience Plus – Click here to download.
- GApps – Included with ROM.
- GCam Port – Click here to download.
- GCam config file- Click here to download.
- Magisk – Click here to download.
- ADB software (For Windows) / Android zip file (For Mac)
If you are on a Mac you need to
- Extract the Android zip and place the folder on your Desktop.
- Open Terminal
- Type cd Desktop/Android
- Enter ./ADB-Install-Mac.sh
Follow the procedure mentioned below to flash the ROM on the device,
- Switch off the phone and boot it into fastboot mode by long pressing Power and Volume down buttons simultaneously.
- Connect your phone to PC by a USB cable, open command prompt on your PC and navigate to the folder where you have saved TWRP img file.
- Type ‘fastboot devices’ in command prompt and check if the device is detected by the system.
- If the system detects the phone, type ‘fastboot flash recovery_filename.img’ and hit enter, the process will be completed in seconds.
- Now long-press the Volume up and Power Button to boot the phone in recovery mode.
- It will ask to allow modifications, slide towards the right to allow Modifications.
- Select ‘Wipe’, click on ‘Format Data’ and type ‘Yes’. Go to ‘Advanced Wipe’, select ‘Dalvik / ART Cache’, ‘System’. ‘Data’, ‘Cache’ and then swipe towards the right to Wipe.
- Go back and click on ‘Install’, navigate to the location where you have stored required zip files, it’s better to keep these zip files on SD Card or USB OTG drives. Select the ROM zip, and Magisk (optional), then swipe towards the right to flash.
- Click on ‘Reboot’ and then ‘System’, within 10-15 minutes device will boot with Pixel Experience Plus.
Credits: We would like to acknowledge the efforts of Shreejoy Dash, Billaids towards developing Pixel Experience Plus for the Redmi Note 8, Mauronofrio for the development of TWRP Recovery for Redmi Note 8, Dmitry Nechiporenko for the development of GCam, ghostrider_reborn for camera fix zip and all developers who contribute to the development of Magisk and Magisk Modules.


